BNI Online – Zoom Tech Tips For Visitors

With the advent of Covid-19 in 2020, Business Networking International (BNI) quickly responded to the challenge and ushered in an era of online meetings across the globe. In the span of one week, BNI established over 10,000 licensed copies of Zoom to help chapters continue the process of referral-based marketing and networking. In the weeks that followed, BNI established written procedures, PowerPoint meeting agendas, online meeting guidelines, blogs, live video training sessions and other resources to help chapter members and their guests maximize their experience in this new era of social distancing and web-based meetings.

Google-My-Business

This blog is a guide to help BNI members onboard their visitors to our virtual meetings PRIOR to showing up the day of the meeting. Following these best practices will help ensure visitors and guests are ready for the Zoom meeting experience the minute they join the BNI online meeting!

  1. Register your guest or visitor through BNIConnect.com so that the meeting hosts know who will be in attendance. Many chapters do not allow visitors into the meeting if they are not pre-registered.
  2. When inviting a visitor or guest, practice using Zoom with them prior to the meeting. Zoom provides a free account to facilitate short, 40-min. or less, meetings.
  3. Encourage visitors to use a desktop or laptop for the best meeting experience
  4. Recommend using a headset with a microphone
  5. Pay attention to your room lighting and your meeting space background. Lights and windows positioned behind you will cause a silhouette effect and prevent us from seeing your smiling face.
  6. Keep yourself muted until it is your turn to present
  7. Use the chat function to communicate problems with video, mic or speakers
  8. Do not use the chat for sidebar conversations
  9. STAY FOCUSED on the meeting just as you would for an in person meeting.
  10. Turn off phones and other distractions
  11. Keep your video camera on during the meeting, but turn it off if you need to leave your desk, take an emergency call or deal with a disruptive poodle. 🙂
  12. Take notes during the meeting: referral ideas, new learning, questions
  13. Don’t have side conversations in the chat, except to ask relevant questions or get help for tech issues.

Download the “tech tips” power point slide for your chapter’s meeting agenda

Tech Tips PowerPoint Slide…

bni-online-zoom-tech-tips-agenda-slide

Check out our other BNI articles too…

Posted in BNI | Tagged , , | Leave a comment

How to Add an Additional Owner/Admin to a Google Business Profile Account

This article was updated on September 24, 2022.

Google-My-Business

Creating and/or verifying a Google Business  Profile (formerly known as Google My Business) account is one of the most important things a local business can do to show up in Google search results organically. A Google Business listing is required for a business to show up on Google Maps. If your business is incorporated, you may already have a listing in Google Business. In this case, claiming and verifying the listing is your first step toward optimizing it.

Once the Google Business Profile listing has been claimed, one or more page managers can be added to the account. A page manager might be needed to add graphics such as a logo and banner image.

Whoever claimed the Google Business listing will need to be the one to log in and add the page manager to the account. These steps will guide you through the process.

  1. Go to google.com/business to sign into your Google Business Profile account.
  2. If you manage more than one business, the Manage locations page will open.
  3. Click on the name of the business.
    Step3
  4. Your Google Business home page will open. (If you only manage one business on Google, you will not need to navigate through the Manage locations page.)
  5. Select the options button (three vertical dots) in the upper right corner of your management tools menu. In the menu that comes up, click “Business Profile settings.”
    Step5aStep5b
  6. The Managers dialogue will open. Click the “Add” icon just below the text.
    Step6
  7. In the next dialogue, add the email address of the new owner/admin. It should be an email account that is connected to Google. Select “Owner” in the bullet selection menu and click “Invite.”
    Step7
  8. All Done! The new owner/admin should receive an email from Google Business indicating there is a request to add them as an “Owner” to the Google Business Profile account.

Clients often want me to take care of this process for them. In this case, they give me their email address and password to log into their Google account to complete the task.

Check out my other “How To…” articles.

Posted in How To... | Tagged , , , , , | 1 Comment

Twitter SEO

twitter seo

This article was updated on March 5, 2020.

Twitter SEO strategies are as simple as they are effective. However, many small businesses still do not take advantage of this key social media platform which can help drive traffic, leads, and ultimately new business. One of the hallmarks of Twitter is its simple and open design. Many people appreciate the authentic communication on this social media platform. Twitter is still, for the most part, focused on publicly-oriented discourse. By contrast, Facebook personal accounts are private and business Facebook accounts continue to suffer from algorithmic obscurity unless advertising is implemented.

Make sure you are taking advantage of these key ways to increase your SEO with Twitter.

  1. Pick a Twitter handle that closely represents your business or brand name. For example, singer/songwriter Ashley Phillips’ brand name is APSoul. Her Twitter account is aptly named: twitter.com/apsoul. If another person or business has taken the name you wish to use, Twitter may grant you the use of the handle if your business name is trademarked. (Thanks to fellow blogger, Blair Pettrey, for that bit of wisdom!)
  2. Link to your website and include your location. Twitter makes it easy to ensure you include these elements, so be sure to use them! Even if you are an international organization, adding a local city and state to your Twitter profile will help optimize your business for local searches and won’t negatively affect international searches.
  3. Be descriptive in your profile and use keywords in your industry. Twitter profiles are searchable by keyword, so including a few hashtags and/or keywords that describe your business will help increase your reach.

Best SEO Podcast Twitter header


  1. Post regularly about your industry and be sure NOT to begin tweets with someone’s Twitter handle. In the book, Jab, Jab, Jab, Right Hook: How to Tell Your Story in a Noisy, Social World, by Gary Vaynerchuk, he explains that beginning a tweet with an account name will prevent most people from seeing the tweet. By beginning a tweet with a Twitter handle such as @garyvee, Twitter assumes you only want to speak with that one person so it only shows the tweet to that individual plus people you BOTH follow. Dirk Hoag’s blog describes this process in great detail and offers an easy hack to make sure your tweet can be seen by all.

twitter-seo-example

  1. Mention others in your tweets. Mentioning other Twitter users in your posts is the primary way to begin a conversation with someone. At a minimum, it at least allows them know you have them in mind. A word to the wise: Don’t tag others in your tweets unless you are speaking to or about them directly or are certain the tweet is relevant to the person or company involved. Mention other Twitter users with authentic references in conversations for the best organic results. #FF posts, aka Follow Friday, a way to tell the world whom you would suggest as a good person to follow, have declined in popularity in recent years, but can still be used mindfully on occasion. For more details and history of #FF, read “The Origin of Follow Friday “ by Jeff Hester.

Browse my other Social Media Tips and SEO topics and share your thoughts!

Posted in SEO, Social Media | Tagged , , , , , , , | 2 Comments

How to Allow Someone to Follow You on Facebook Without “Friending”

follow without friendingThis article was updated on February 12, 2020.

I have received several inquiries from small business professionals asking how to let someone follow their personal Facebook page without adding them as a friend. It may sound like an unusual request, but there are some occasions when business professionals would like to allow others the ability to follow their public posts on a personal Facebook account without adding them as a friend and giving them access to their personal information. Some examples may include:

  • Authors and artists who wish to give fans a glimpse into their personal life from selected public posts
  • Promoters and marketing professionals who want to use every opportunity for someone to connect
  • Professionals who don’t have a business Facebook page, but want to connect and share select information from their Facebook account
  • High profile employees or staff that want to allow colleagues, acquaintances or others access to selected posts.

Special Facebook settings will allow people who are not your friends to view your public posts, but not give them access to your personal information. Here are the steps to enable the “Follow” button to appear on your cover photo:

  1. Log into your personal Facebook account.
  2. Click the arrow in the top right corner of the page. A drop-down menu will appear. Select “Settings” from the list.
  3. The General Account Settings page will open. On the left-hand side of the page, select “Privacy.”
    Facebook privacy settings sidebar
  4. The Privacy Settings and Tools window will open. Answer questions regarding who can see your future posts, who can send you a friend request, and other privacy-related details. Select “Friends” if you prefer only your Facebook friends to see your posts by default.Facebook Privacy and Tools window
  5. Go to the left-hand side of the Privacy Settings and Tools page and click “Public Posts.” The Public Post Filters and Tools page will open.Facebook Public Post Filters and Tools
  6. Set “Who Can Follow Me” to “Public.” This will allow a button to appear on your cover photo that says “Follow.” You can now choose specific people you would like to “friend,” while anyone will be able to view and follow your public posts.Facebook Add Friend and Follow buttons
  7. When you make each post, choose the level of privacy you prefer. You can choose to share a post with all of your Facebook friends, only certain friends, or you can make your post public. Public posts will be viewable by everyone including your followers.

Learn about what Facebook has to say about Follower Settings and browse our other social media tips, too!


Posted in How To..., Social Media | Tagged , , , , | 1 Comment

How to Create a Short LinkedIn URL

This article was updated on January 6, 2020.

How to Create A Short LinkedIn URL - with LinkedIn iconThere are many business networking and employment opportunities to be found at LinkedIn.com. In addition to making connections and perusing the site in real time, there is great value in sharing your LinkedIn profile URL online and on business cards so that others can connect with you. To that end, it is a good idea to change your randomly-generated LinkedIn URL to something short and memorable relating to your name or company name. Here’s how:

Create a LinkedIn URL for Your Personal Profile

  1. Go to your profile page.
  2. On the right top corner of the page, click “Edit public profile & URL.” A new page called “Public profile settings” will open.

Edit public profile & URL on LinkedIn

  1. On the top right corner of the Public profile settings page, click the edit pencil in the “Edit your custom URL” section.

Edit your custom LinkedIn URL

  1. Personalize your URL. Your custom URL must contain 3-100 letters or numbers. You won’t be able to use spaces, symbols, or special characters. Remember, short and memorable is best.
  2. Click “Save.”
  3. Done!

Customize the URL on Your Company Page

  1. Log into your LinkedIn account. Make sure your account has the admin rights to your LinkedIn company page.
  2. On the top right corner of your company page below the View as member button, click the arrow next to “Admin tools.” Then, click “Public URL” in the drop-down menu. Check to see that you have chosen a unique URL for your company page.
    LinkedIn Admin tools
  3. If you haven’t, try going to the page of your first choice, for example: https://www.linkedin.com/company/MyNewCompanyName. If you get the error message below, you’re in luck! This means the URL you would like to use is available. Otherwise, keep trying until you find another one that is short, memorable, works for your branding, and is not in use.
    LinkedIn Oops screen
  4. Submit a request to change your URL using the LinkedIn Contact Us Form. Make sure to include your company name, company e-mail address that has admin rights, current company page URL, and the company URL to which you would like to make the change.
  5. Wait for LinkedIn to contact you to say that your company URL has been customized.
  6. Done!


View my other “How To…” articles.

Posted in How To... | Tagged , , | 2 Comments

How to Find and Disavow Harmful Backlinks in Google Search Console

This article was updated on October 31, 2019.

howtodisavow
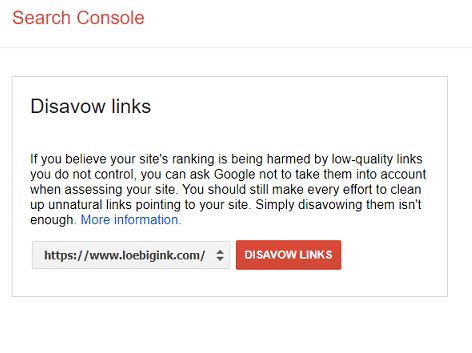
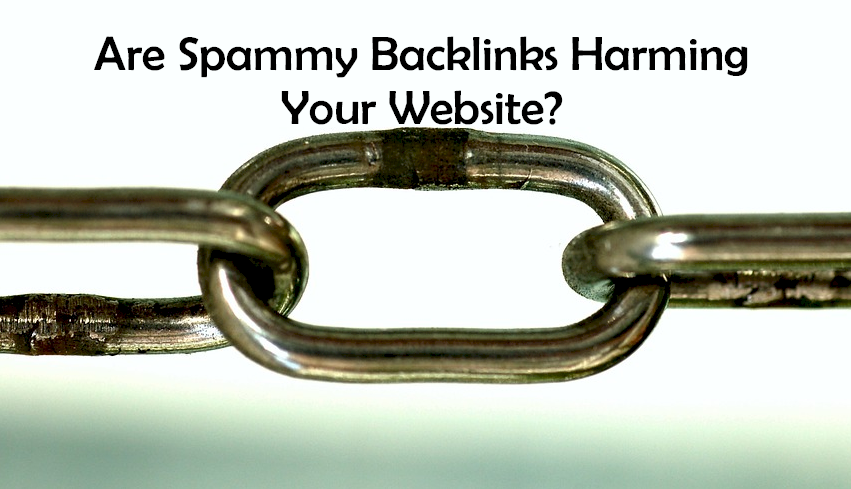
The possibility of your website being affected by negative SEO techniques still shows its ugly face in our competitive online world. Website owners see the value in increasing their search engine visibility, and not all of them go about it in ways that are ethical. The analytics gurus at Alexa blog describe the issue in detail in the article, “Negative SEO is Real.” The main sources of harm come from link farms, spammy links, scraped content that is duplicated across the web, fake reviews, hacked websites, and malware attacks.

Our SEO team has seen each of these problems across the hundreds of SEO projects we have managed. One of the most prominent problems we see regularly is harmful and spammy backlinks. A quality backlink monitoring tool such as Majestic.com, SEMRush.com, or Ahrefs.com should be in every site owner’s toolbox. The following steps were created to help you identify these links and to signal to Google not to penalize your site when these backlinks appear.

  1. Explore the backlinks and create a .txt file of all the domains you wish to disavow.
    • Go to Majestic.com and search for your domain in the main Site Explorer Results search field. Use the Historic Index for the most comprehensive results.Majestic Site Explorer
    • Select the Ref Domains tab to get a list of the referring domains.
    • Click on the number listed in the Backlinks column to reveal the top ten links from each suspicious website. A root domain with a Trust Flow score of zero and a high Citation Flow score is sign that a site may be harmful.
    • Visit a few links to determine if they appear to be from a site created for the sole purpose of creating backlinks, i.e. a spammy website.
    • If the site is spammy, create a .txt file in MS Notepad or a similar plain text editor. Add the domain on the top line preceded by “domain,” such as domain:crimsonnight.net
    • Continue until all spammy domains are listed. Put each domain on its own line.
    • Save the file using this naming convention: disavow2019-10-31.txt
    • Log into your Google Search Console account.
    • Visit: https://www.google.com/webmasters/tools/disavow-links-main. Select the domain from which you want to disavow links and click “DISAVOW LINKS.”

Google Disavow LinksRead the note from Google:

This is an advanced feature and should only be used with caution. If used incorrectly, this feature can potentially harm your site’s performance in Google’s search results. We recommend that you only disavow backlinks if you believe that there are a considerable number of spammy, artificial, or low-quality links pointing to your site, and if you are confident that the links are causing issues for you.

    • Click “Disavow Links.”
  1. Choose the file that contains the list of links you want to disavow. Click “Submit” and then click “Done.”
  2. Navigate back to the Google Search Console dashboard, click “Sitemaps” on the left side of the page, select the website URL, and resubmit the XML sitemap in the “Add a new sitemap” field. Click “SUBMIT.”
    Google Search Console - Add a New Sitemap
  3. Done!

Note: Google references a single .txt file when indexing a website, so any future domains that need to be disavowed should be added to the list of already disavowed domains, saved as a new .txt file, and uploaded again, which will replace the file that was previously created.

Feel free to contact us if you have a question about a link you may want to disavow or if you would prefer to have our SEO team evaluate your backlink profile for the presence of harmful backlinks.

Read our other “How To” articles…

References:

Posted in How To..., SEO | Tagged , , , , , | Leave a comment

How to Add an Ads Manager to Your Twitter Account

This article was updated on 8/30/2019.

Twitter logo + manager drawing

Your organic Twitter account can be a very viable way to reach people with the information you want them to know. A Twitter Ads account allows you to use Promoted Tweet campaigns that do even more to target very specific audiences or followers of other relevant Twitter pages. If you would like to add a Twitter Ads Manager to help you set up and monitor your campaigns, it is a fairly simple process. Here’s how.

To give a new Ads Manager access to your Twitter Ads account,

  1. Log into your Twitter Ads account here: https://ads.twitter.com/. If you are already logged into Twitter, you will be logged into Twitter Ads when you navigate to this URL.
  2. If you work with more than one advertising account, select the account to which you would like to add an Ads Manager.
  3. In the top right-hand corner, click the drop-down menu under your account name and select “Edit access to account.”Twitter Ads account drop down menu
  4. The Edit access to account window will open. Click the “Add access” button on the right-hand side.Twitter Ads account Add access and Edit access buttons
  5. Enter the new account manager’s name or Twitter handle in the text field. Select the contact when it appears.
  6. Just to the right of the text field, choose the level of access. The “Ad manager” level will grant full access to modify campaigns and view data, but not to add or remove users or change settings. “Account administrator” includes the permission to change users and settings, create Twitter cards, and create tracking pixels to measure website conversions.Twitter Ads account permissions list
  7. Click “Save changes.”
  8. Done!

Read our other “How To” articles…


Posted in How To... | Tagged , , , | Leave a comment

How to Add an Ads Manager to Your Facebook Page

This article was published on 8/14/2014. It was updated on 7/10/2016 and 6/25/2019. 

facebook-ads-logo, small

If you are a Business Manager Admin of one or more Facebook pages, you may want to add others to take on administrative roles. Delegating a task to someone you trust can be an important step in both time management and business development. Here is how to add an Ads Manager to a Facebook page:

  1. Log into your Ads Manager Account: https://www.facebook.com/ads/manager/account_settings. The Ad Account Setup page will appear.
  2. If you manage multiple business pages, use the drop-down menu on the left side of the page at the top to choose the correct business page.
  3. On the right side of the page below the Attribution information, you will see the Ad Account Roles box. Click “Add People.”

Facebook Ad Account Roles - Add People

The Add People To This Ad Account window will open.

Add People to This Account Window - Facebook Ads for a Business page

  1. Enter the name of the Facebook friend to whom you want to assign a role. From the drop-down menu, choose the role you are assigning.

Add People to This Account Window with Facebook friend's name selected- Facebook Ads for a Business page

An Ad Account Advertiser can see and edit ads as well as set up new ads using the payment method that is associated with the account. An Ad Account Admin can not only do those tasks but can also edit the method of payment for ads and manage admin permissions. An Ad Account Analyst can only view ad performance and could not help to manage the account.

  1. Once the correct person and ad management role have been selected, click “Confirm.”
  2. Done!

View our other “How To…” articles.


Save

Posted in Social Media | Tagged , , | 4 Comments

How to Create a Short Link for a Google Review Using Bit.ly

Create a Link for Google ReviewsOne of the best ways to build a positive reputation and a strong web presence for your business is to give some attention to your Google reviews. Pestering your customers or clients for reviews is not likely to yield a positive outcome, but a friendly request can go a long way. At the end of your service, you may want to say something like, “Thank you very much! It was great working with you. If you had a good experience with us, we’d love it if you’d leave us a review on Google.”

A visual request for reviews may be even more effective for bringing in some positive words about what you do. Provide a link on your web pages, in emails, and find other creative ways to share a link to capture your customer’s desire to say something great about you. Here’s how:

  1. Use google.com to search for your business.
  2. Click on your business listing. Find the “Write a review” button and click it.Loebig Ink on Google
    A “Rate and review” box will open.
  3. The web address for the “Rate and review” box will appear at the top of the page. It will be very long.https://www.google.com/search?source=hp&ei=Fbq8XNaVDaGq_QaN65vQBg&q=loebig+ink&btnK=Google+Search&oq=loebig+ink&gs_l=psy-ab.3..0.1690.3653..4312…0.0..0.81.756.11……0….1..gws-wiz…..0..0i131j0i131i10j0i10j0i22i30.NxL doFwaGk#btnK=Google%20Search&lrd=0x89b7ceca5e5fcd8b:0xeae7036204131d65,3,,,
  4. Log into to bit.ly, or follow the steps to open a free account if you don’t have one already.
  5. Click the “Create” button in the upper right corner.Search and Create at bit.ly
  6. The “CREATE BITLINK” window will open on the right side of the page.Create Bitlink window
  7. Copy and paste the long web address in the “PASTE LONG URL” box and click “CREATE.” A new, short web address will appear.Edit Bitlink
  8. Edit the end of the short web address to make it more memorable, such as http://bit.ly/Loebig. Click “SAVE.”Edit bitlink - Loebig URL
  9. Share the new short link to increase your Google reviews!
  10. If your business doesn’t show up on the map when you search google.com:
  11. Find it on maps.google.com.
  12. A window will open on the left side of the page.Loebig Ink on Google Maps
  13. Scroll down and click the “Write a review” button. A “Rate and review” box will open.
  14. Follow steps 3 – 9.

View our other â€śHow To…” articles.

Posted in How To... | Tagged , , | Leave a comment

Increase Visibility Using The Top Small Business Directories

This article was published by Brian Loebig on 2/13/2014. It was updated by Stephen Rabil on 3/10/2021

. 

Increase your visibility image for small businesses in these local directoriesSmall business owners are always on the lookout for the lowest cost, highest value promotional opportunities on the Internet. Creating or claiming local business directory listings is a great way to expand ones digital footprint.

Many Internet service providers have identified the value of local directories which has spawned a bevy of mass listing services such as Yext.com, CityGrid and others. These services make it easy to claim a large list of directories that may or may not be relevant to a business. The listing provider’s monthly fees tie a business into a relationship with them for life since discontinuing their service will remove your business information from the listing en masse.  A more time intensive, but lower cost, approach is to claim ones business listings by hand with the top directories relevant for your industry.

The following list of directories are recommended for a wide variety of businesses and industries. Links to the business listing page of the directory will make it easier to begin creating or claiming your business listings.(*Note: Always be sure to search for your business listing in each directory before creating a brand new one. Removing duplicate listings in these directories is equally as important.)

  1. Google My Business : *Domain Authority 90
    1. This is the first and arguably the most important directory a local business should list their business. Google My Business is key for local SEO to ensure customers can find your business on Google Maps.
      1. Your first step will be to sign in using an email account associated with Google. If you don’t have one that is connected to Google, you will need to set one up. Click here for to for a quick how to guide . A Gmail account is an easy choice, but you can also associate a non-Gmail account with Google.
    2. There are usually several quick verification options (e.g. via a business email or telephone number) to get your profile published immediately. However, in certain instances, post-card verification is required and can take up to two weeks to be mailed and received.
  2. Yelp for Business : *Domain Authority 94
    1. Yelp has become one of the most popular and important directory and review sites for a business due in part to the rigid system of controlled reviews on the site. Yelp works tirelessly to ensure reviews submitted are by real people and customers through a series of algorithmic controls that filters questionable reviews out of site.
    2. Like most directory sites, you will be guided through a search process to see if your business is already listed. If it is, you will “claim” the listing. If not, you will be able to create a new Yelp listing.
  3. Four Square: *Domain Authority 92
    1. Foursquare, is a local search-and-discovery mobile app which provides search results for its users. The app provides personalized recommendations of places to go near a user’s current location based on users’ previous browsing history and check-in history.
    2. There are three  steps to create a listing in this directory:
      1. First create an individual user profile.
      2. Next create your business listing.
      3. Lastly, claim your business listing.
    3. Upon claiming your business listing there is a one-time $20 fee to get your listing published in the directory.
    4. Claims to be “Trusted by over 150,000 partners and developers worldwide.”
  4. Angie’s List for Business : *Domain Authority 91
    1. Angie’s List is a popular directory and review site of service companies and health care professionals in over 550 categories. Angie’s List customers pay an annual subscription fee to access business listings and reviews from their local area.
    2. Categories include business description, service area, operating hours, services, payment options, 24 hour emergency service designation, etc.
  5. Crunchbase : *Domain Authority 91
    1. Crunchbase is a platform for finding business information about private and public companies. Crunchbase information includes investments and funding information, founding members and individuals in leadership positions, mergers and acquisitions, news, and industry trends.
    2. There are three steps to be aware of when setting up a free listing with this directory:
      1. First, create an individual user profile.
      2. Next, create a company profile.
      3. Lastly, you must use at least two social media account credentials (e.g. Facebook, Twitter, or LinkedIn) to verify each profile. 
    3. Paid listings afford you the opportunity to perform searches for investors, perform competitive analysis of other companies, and perform data analysis of your company’s performance.
  6. Manta : *Domain Authority 87
    1. Manta claims to be the largest online community dedicated to small business. Owners can list their business in the Manta directory for free and take advantage of networking, articles and numerous small business resources.
    2. Free listings include contact information, website link, business description, 3 business categories, products/services, years in business, state of incorporation, NAICS and SIC codes, etc.
    3. Enhanced listings range in price from $49 to $99/mo and include more prominent listings, competitor ad removal, multiple search keywords, etc. Compare plans here: Listing Upgrade Options
  7. Merchant Circle : *Domain Authority 87
    1. Merchant Circle claims to be “the largest online network of local business owners, combining social networking features with customizable web listings that allow local merchants to attract new customers.”
    2. Free listings include address, phone, embedded Google Map, up to three categories for listing the business, customer reviews and compliments as well as the ability of Merchant Circle members to “follow” your business on Merchant Circle.
    3. Paid listings include top search result positioning, business logo thumbnail image, social sharing buttons, website link, payment types, hours of operation, a simple blog, product descriptions, offers and recent news updates.
  8. Hot Frog : *Domain Authority 77
    1. This directory allows for a user to build a really robust business profile. You can list all products and services, create coupon offers, talk about news and updates with your business, and even share a portfolio of projects.
    2. Claims that “1.6 million people are making more than 372,000 inquiries to businesses on Hotfrog every month.”
  9. Next Door for Business : *Domain Authority 75
    1. This directory is great for local SEO because it targets the local neighborhood and surrounding local neighborhoods where businesses operate. You can also create events to go along with your listing.
    2. Recommendations have always been one of the biggest uses of Nextdoor. Members truly value their neighbors’ opinions about businesses, products, and services available in their communities on this platform.
  10. Bing places for business : *Domain Authority 53
    1. Bing Places for business another top-notch directory for local SEO. Many existing businesses are already listed in the Bing places for business directory. If your business is listed you just need to “claim” your business and update the listing.
    2. Free listings include address, phone, website link, hours, Bing map, customer reviews, and the ability for visitors to share the listing via email, Facebook, Twitter, and mobile phone.

*Domain Authority is a ranking metric (based on a 100 point scale) established by the SEO experts at Moz.com. It determines the power of a domain and how well it will rank in Google search results using a  multi-factorial algorithm.

Check out our other SEO Articles for increasing your web presence!

Posted in Marketing, SEO | Tagged , , , , , , , , , , | 3 Comments