

This article was updated on July 18, 2021.
Creating a professional email signature in Gmail is sometimes the last item on a laundry list of burgeoning tasks for a small business professional or entrepreneur. However, creating a professional-looking and socially optimized email signature will contribute to increased connections with your customers, colleagues, and collaborators. Here are the steps:
PART I: Save Small Versions of Your Logo and Social Media Icons
- Save a very small version of your logo to your computer hard drive.
- Find social media icons for each social media site you want to include in your signature.
- Use the Google Images search functionality to find icons. Click the Tools button on the right to reveal additional menu items where you can filter images for size, color, type, and other parameters. Find images that are exactly 20×20 pixels. Alternatively, right click on each image, save, and resize them accordingly.
- Make sure all the icons you want to use have been saved to your hard drive.
PART II: Setup and Colorize the Signature in Gmail
- Log into your Gmail account from your web browser.
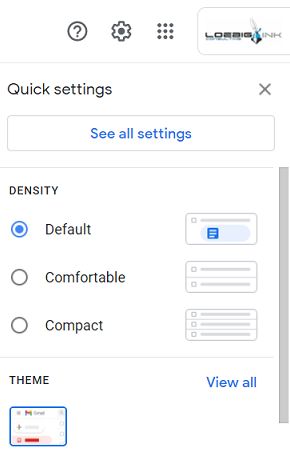
- Click on the wheel icon at the top right side of the Gmail window. Click “See all settings.”
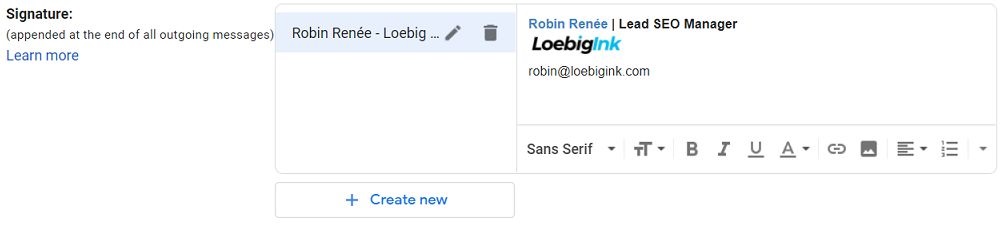
- The Settings page will appear. Scroll down until you see “Signature.” Click “Create new.”

- The New signature window will open. On the left-hand side, type in and save a nickname for the signature. On the right-hand side, type your name and title separated by a vertical line. (The vertical line key is above the enter/return key on your keyboard and is the same key as the forward slash.)
- Then type in your email address on the next line. Use the next lines to add phone numbers, your business address, and other information as you wish.
- Make a space below your name and title. Using the font editing tools below the signature, click the square Insert image icon. The Add an image window will open. Click “Upload” and select your logo from your hard drive. The logo will appear in the signature below your name and title.
- Make the top line of the new signature bold. Add color to your name so it stands out and looks good with the logo colors.
PART III: Add Your Social Media Icons
- Add a space below your contact information and type “FOLLOW ME” in all caps.
- Copy and paste each small social media icon one by one in a line below “FOLLOW ME.”
- Need social media icons? Find some on our blog post “Free Social Media Icons in PNG Format.“
Part IV: Add Hyperlinks
- Click on your logo, then drag it slightly and release it so that the image is highlighted, aka selected.
- Click on the chain link icon below the signature. The Edit Link window will open. Add the website address to the URL field. Click “OK.”
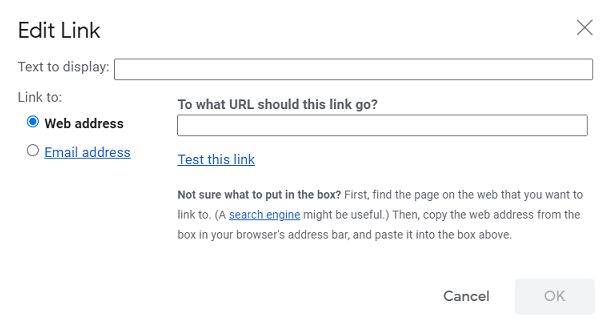
- Repeat this process for each social media icon.
- Beneath “Signature defaults,” select the nickname for the signature you just created.
- Scroll down and click “Save Changes.”
- Compose a new email to see your new professional signature appear!
For more tips and directions, visit our “How to…” directory of technology articles.


Greetings! Very useful advice in this particular article!
It is the little changes that make the most important changes.
Many thanks for sharing!
Hey there very informative post but i use something else to create professional looking signature.
It’s called wisestamp. It’s easy , highly customizable and most importantly you can use it with most popular email services like gmail yahoo etc
I have written a article on WiseStamp : Adds Custom Signatures Email Service on my blog you can check it out from the link below
mrinal
It’s a shame you don’t have a donate button!
I’d without a doubt donate to this superb blog! I guess for now i’ll settle for bookmarking and adding your RSS feed to my Google account.
I look forward to new updates and will talk about this
site with my Facebook group. Talk soon!
Feel free to send a donation via PayPal to my email address. 😉
I absolutely love your blog and find almost all of your post’s to be just what I’m looking
for. Would you offer guest writers to write content for you personally?
I wouldn’t mind writing a post or elaborating on many of the subjects you write related to here. Again, awesome website!
Hi HostMonster. Send me an invite to your Linkedin profile and I will definitely consider it. Thanks for asking.
very informative cant find any 20×20 images….
Hi Miss Honey (Cute email name),
I don’t have any 20px sized icons, but your request motivated me to publish a new article and share the ones I have. Let me know if this meets your needs! http://bit.ly/social_media_buttons
Pingback: Free Social Media Icons in PNG format | The Ink Blog
Very nice. This is a great ‘from scratch’ way to get a slick email signature, but for my Google apps business gmail-powered signature block, I use one I created through this site I found; It allows a good many configurable options.
http://htmlsig.com
Great stuff brian
Thanks Francis.
Reblogged this on Live a passionate life filled with love, care, adventure and bliss.